 Dejvino
7df1a2d785
The legacy I2S driver buffers i2s_write() data in a TX DMA ring
(8x64 samples = 64 ms @ 8 kHz) and hands a buffer back to i2s_write()
only after the DMA finished playing it. After the last queued event
the sound task called i2s_zero_dma_buffer(), which memsets the whole
ring instantly — erasing everything not yet played. Any sound <= 64 ms
was written into free ring space without ever blocking, so the zeroing
wiped it before the DMA reached a single sample: completely silent on
hardware. Longer tones force i2s_write() to block on a full ring,
pacing rendering to real-time playback — hence only long beeps were
audible, and the fade-envelope cap never moved the threshold. Every
game beep <= 80 ms (link-active 10, laser 30, sever 40, bleep/ICE 50,
feedback 80) sat in the dead zone. The emulator never showed it: its
i2s_write shim fed SDL directly and had no ring at all.

Fix: replace the instant zeroing with a paced silence purge — once the
queue drains, write one ring + one chunk of zero samples through
i2s_write(), reusing each DMA buffer only after the DMA played it. The
sound plays out fully and the ring then loops silence (still kills the
tail-replay bug the zeroing existed for). Keep the envelope cap at
total/4 so short tones keep a steady-state portion.

Emulator shim gains a TX DMA ring model (write/play cursors + bounded
DAC-emitted log) so the bug class reproduces headlessly: unit/
sound_short_tone_reaches_dac fails on the zero_dma code, passes on the
purge (A/B verified); shim_zero_dma_erases_unplayed pins model fidelity;
sound_long_tone_plays_out_fully guards against truncation. SoundEngine
gains a pumpOne() test seam and begin(spawnTask) for deterministic
driving. Full suite: 26 unit + 7 integration + 4 E2E, 0 failures.
✨ LilyGO T-Deck ✨
English | 中文
[!TIP]
For the factory firmware of the new version, please visit LilyGoLib.
News:
- T-Deck-Plus has assigned the pins on the Grove interface to the GPS module, so the Grove interface of T-Deck-Plus cannot be used.
- T-Deck updated TFT_eSPI ST7789 initialization sequence on 20240726. Currently, the changes have not been pushed to the TFT_eSPI upstream branch. If you find that the screen display is incorrect during use, please check whether this is consistent with the initialization sequence in the warehouse.
1️⃣ Examples preview
examples
├─Keyboard_ESP32C3       # ESP32C3 keyboard I2C slave
├─Keyboard_T_Deck_Master # T-Deck read from keyboard
├─LoRaWAN_Starter        # LoRaWAN example
├─Microphone             # Noise detection
├─Touchpad               # Read touch coordinates
├─GPSShield              # GPS Shield example
├─lvgl_example           # lvgl example
├─MissileCommand         # arcade game
├─CrtTerminal            # CRT monitor terminal emulator
└─UnitTest               # Factory hardware unit testing
2️⃣ Quick Start
PlatformIO
- Install VisualStudioCode and Python
- Search for the
PlatformIOplugin in theVisualStudioCodeextension and install it. - After the installation is complete, you need to restart
VisualStudioCode - After restarting
VisualStudioCode, selectFilein the upper left corner ofVisualStudioCode->Open Folder-> select theT-Deckdirectory - Click on the
platformio.inifile, and in theplatformiocolumn, cancel the sample line that needs to be used, please make sure that only one line is valid - Click the (✔) symbol in the lower left corner to compile
- Connect the board to the computer USB
- Click (→) to upload firmware
- Click (plug symbol) to monitor serial output
Optional:
You can upload the assets contents for the speaker demo, using the "Upload Filesystem Image" on PlatformIO menu.
ArduinoIDE
- Install Arduino IDE
- In Arduino Preferences, on the Settings tab, enter the
https://raw.githubusercontent.com/espressif/arduino-esp32/gh-pages/package_esp32_index.jsonURL in theAdditional boards manager URLsinput box. Please pay attention to the version. The test phase is using 2.0.14. It is not certain that versions above 2.0.14 can run. When the operation is abnormal, please downgrade to a version below 2.0.14. , As of 2024/08/02, TFT_eSPI does not work on versions higher than 2.0.14, see TFT_eSPI/issue3329 - Copy all the folders in the
T-Deck/libdirectory to<C:\Users\UserName\Documents\Arduino\libraries>. If there is nolibrariesdirectory, please create a new one. Please note that you are not copying thelibdirectory, but copying the folders in the lib directory - Open ArduinoIDE ,
Tools, Look at the picture to chooseT-Deck(ESP32S3) T-Keyboard(ESP32C3) 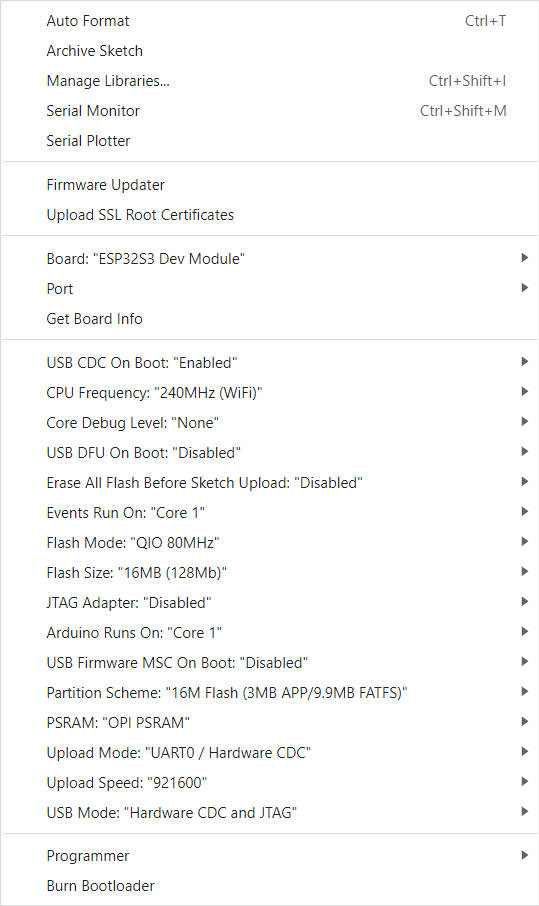
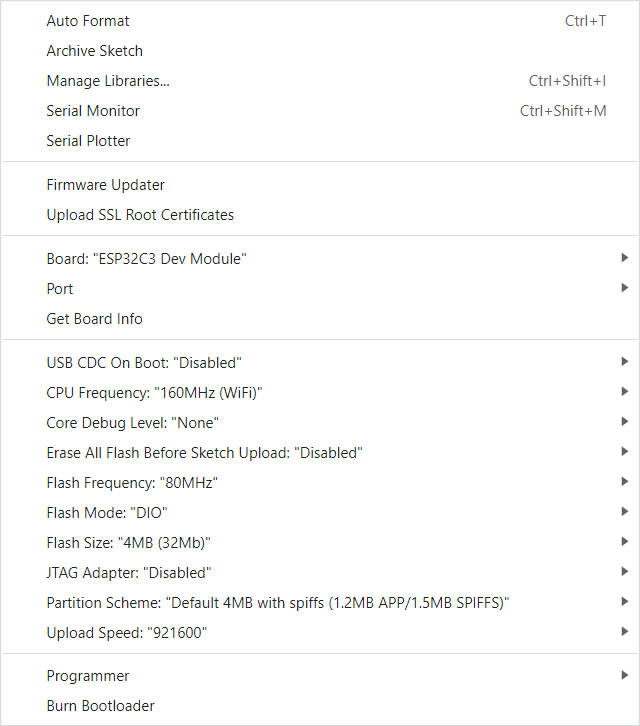
- Insert USB into the PC and click Upload <If the upload fails, keep pressing the BOOT button, click RST, and then click Upload. When the upload is complete, click RST to exit the download mode>


3️⃣ Tips:
-
If a microphone is used, the GPIOO button cannot be used
-
If the sketch cannot be uploaded, then you need to press down the middle of the trackball, and then insert the USB, this means the chip is in the download mode, and then click to upload the sketch.
-
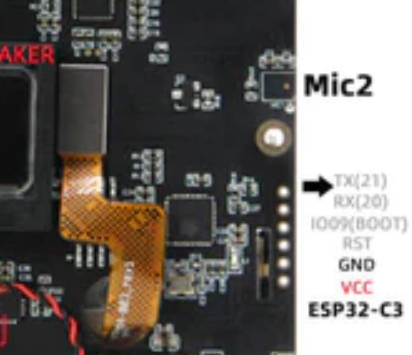
T-Keyboard the programming and burning interface of ESP32C3 is located at the 6Pin header on the side of the RST button, and the order starts from the top of the RST button, which are TX,RX,BOOT,RST,GND,VCC, You need to connect USB TO TTL externally to burn the keyboard firmware. For TTL without automatic download circuit, before powering on, short-circuit the BOOT Pin and GND, and then power on. At this time, T-Keyboard will enter the download mode. After the burning is completed, you need to disconnect GND and BOOT before running the program.
-
T-Deck can't upload any sketch,Please enter the upload mode manually.
- Connect the USB-C cable
- Toggle the switch to ON
- Press and hold the center trackball
- Press the left reset button
- Upload sketch
- If you still cannot upload the sketch successfully according to the above method, please check whether the resistor in this issue62 exists. Please remove it and test again.
- How to enter download mode Youtube
-
fatal error: esp_vad.h: No such file or directory
- See issus
-
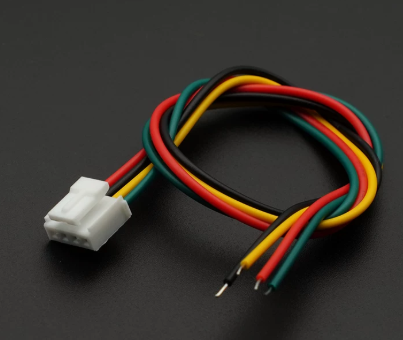
Grove interface model?
- HY2.0-4P


4️⃣ Where to buy:
5️⃣ Pins:
See utilities.h
Shell
- See shell

SDL emulator (run sketches on your PC)
emulator/ hosts a small SDL2 harness that runs selected example sketches
without hardware (framebuffer, keyboard, trackball and touch are emulated):
cd emulator
make run                  # MissileCommand (default)
make run APP=CrtTerminal  # CRT terminal
make smoke APP=CrtTerminal  # headless: N frames + BMP dump, --type "keys\n"